Monday, March 7, 2011

Friday, March 4, 2011

New at Bumbershoot Supplies. Antique Bohemian Flower Cabochons and Their History


Words cannot describe how thrilled I am to be able to offer a limited number of these rare antique Czech glass flower cabochons, just arrived at Bumbershoot Supplies.

We have gorgeous ivory and pale beige-y pink in 2 sizes. These cabochons are truly a part of glass and costume jewelry history. The character of the glass is unlike anything I have seen before, the colors so delicate and yet rich at the same time, and the glass has a really gorgeous sheen.


These are so special, I want to share a bit of their history with you. Until WWII, the Gablonz area of Czechoslovakia was home to some of the finest glass artisans in the world. That is where these cabochons were made, back in the 1920's to 1930's. These cabochons, and many rhinestones also, are press molded, which means that molten glass is pressed between dies to create the shape. This was done by single glass artisans, just a few pieces at time. For these cabochons, intricately carved dies were used and the detail is magnificent and precise. The glass is pressed in what looks like big tongs and then the finished pieces are released. This may sound simple, but as I learned in Sibylle Jargstorf's book "Baubles, Buttons and Beads. The Heritage of Bohemia" success depends on many factors. First, you have to have a good die, so the collaboration between engravers and glass artists was important. Second, for the pressing, the glass must be at the correct temperature - too hot/soft or too cool/thick creates various problems. Temperature is also important in regards to color because with some colors of glass, the color changes with different temperatures. Also the die must be at the correct temperature. If it is too cold, minute surface cracks can appear on the cabochon or rhinestone. If the die is too hot, the glass will fuse to the metal and the stones or cabochons cannot be released from the mold. There are additional considerations when creating glass rhinestones, since those are faceted on both sides.  To get those beautiful facets on both sides requires an understanding of how the physics of gravity acts on cooling glass. 


For both cabochons and rhinestones, there may be many other steps after the piece is released from the mold, depending on the purpose and plans for the batch that is being made. These can include shearing to clean up the edges and facets, polishing of various sorts, beveling and foiling. All of these additional steps require the expertise of specialist artisans.

So, when I consider these vintage glass cabochons and our vintage rhinestones, I am truly in awe of the many steps involved and the many (unsung) artisans involved, all working together to bring these beautiful baubles to a finished state. I am so grateful to them for the beauty they have created and I am absolutely thrilled to have located these treasures to share with you.

Wednesday, March 2, 2011

One of My Favorite Artists Has a New Jewelry Design


You may have read about one of my favorite artists of all time, my daughter Emma, in this blog post.

She's at it again! She's taking a laboratory science class at college this quarter and in class they extracted some of their own DNA and captured it in this necklace.

Cool! It was a very simple process to extract this DNA - kitchen table science, there are lots of how tos available with a quick Google search. She extracted the DNA from cells from the inside of her cheek. The biggest issue is being sure to get enough cells to start with. What about a line of personalized jewelry where people send you cheek cells, the DNA is extracted and sent back to them in a glass vial necklace? The nerdy scientist in me is just thinking out loud here...

Tuesday, March 1, 2011

Dots. Vintage Mother of Pearl Stud Earrings from Bumbershoot Designs


Many thanks to Chloe for featuring these earrings on her fashion and art blog sixthirtythree. The Dress of the Week theme this week is Dynamic Grooves. Check it out! It's a great dress!

Monday, February 28, 2011

Monday in Seattle. Picture and Quote for the Week, To A Snow-Drop


snowdrops, Discovery Park, Seattle

Lone flower, hemmed in with snows and white as they
But hardier far, once more I see thee bend
Thy forehead, as if fearful to offend,
Like an unbidden guest. Though day by day,
Storms, sallying from the mountain-tops, waylay
The rising sun, and on the plains descend;
Yet art thou welcome, welcome as a friend...

~ from To A Snow-Drop by William Wordsworth

Saturday, February 26, 2011

Tutorial: A Simple Way to Alter Patina on Vintage Brass


This post will share one method I use to clean and change the patina of vintage brass.

We stock a lot of materials at Bumbershoot Supplies that are made of or contain brass components. Of course, raw, unsealed or untreated brass develops a patina over time. Sometimes that is a very pleasing effect and quite desirable for vintage-inspired designs.


These brass beads, for example, have a fabulous gingerbread patina that is simply gorgeous.

Sometimes, however, the character of the patina is not quite right for the particular design purposes.


For example, consider these charms from 1950’s Japan, which we stock at Bumbershoot Supplies. You can see that the patina is uneven. For my particular designs I wanted a vintage inspired look and I was concerned that using them as is might make them look vintage, but not inspired. What to do? I show another example of the same thing below.


There are choices. I could try to clean up the brass, restoring it to the original golden color. Or I could use chemicals to patina all of the brass, making it all a uniform dark color.

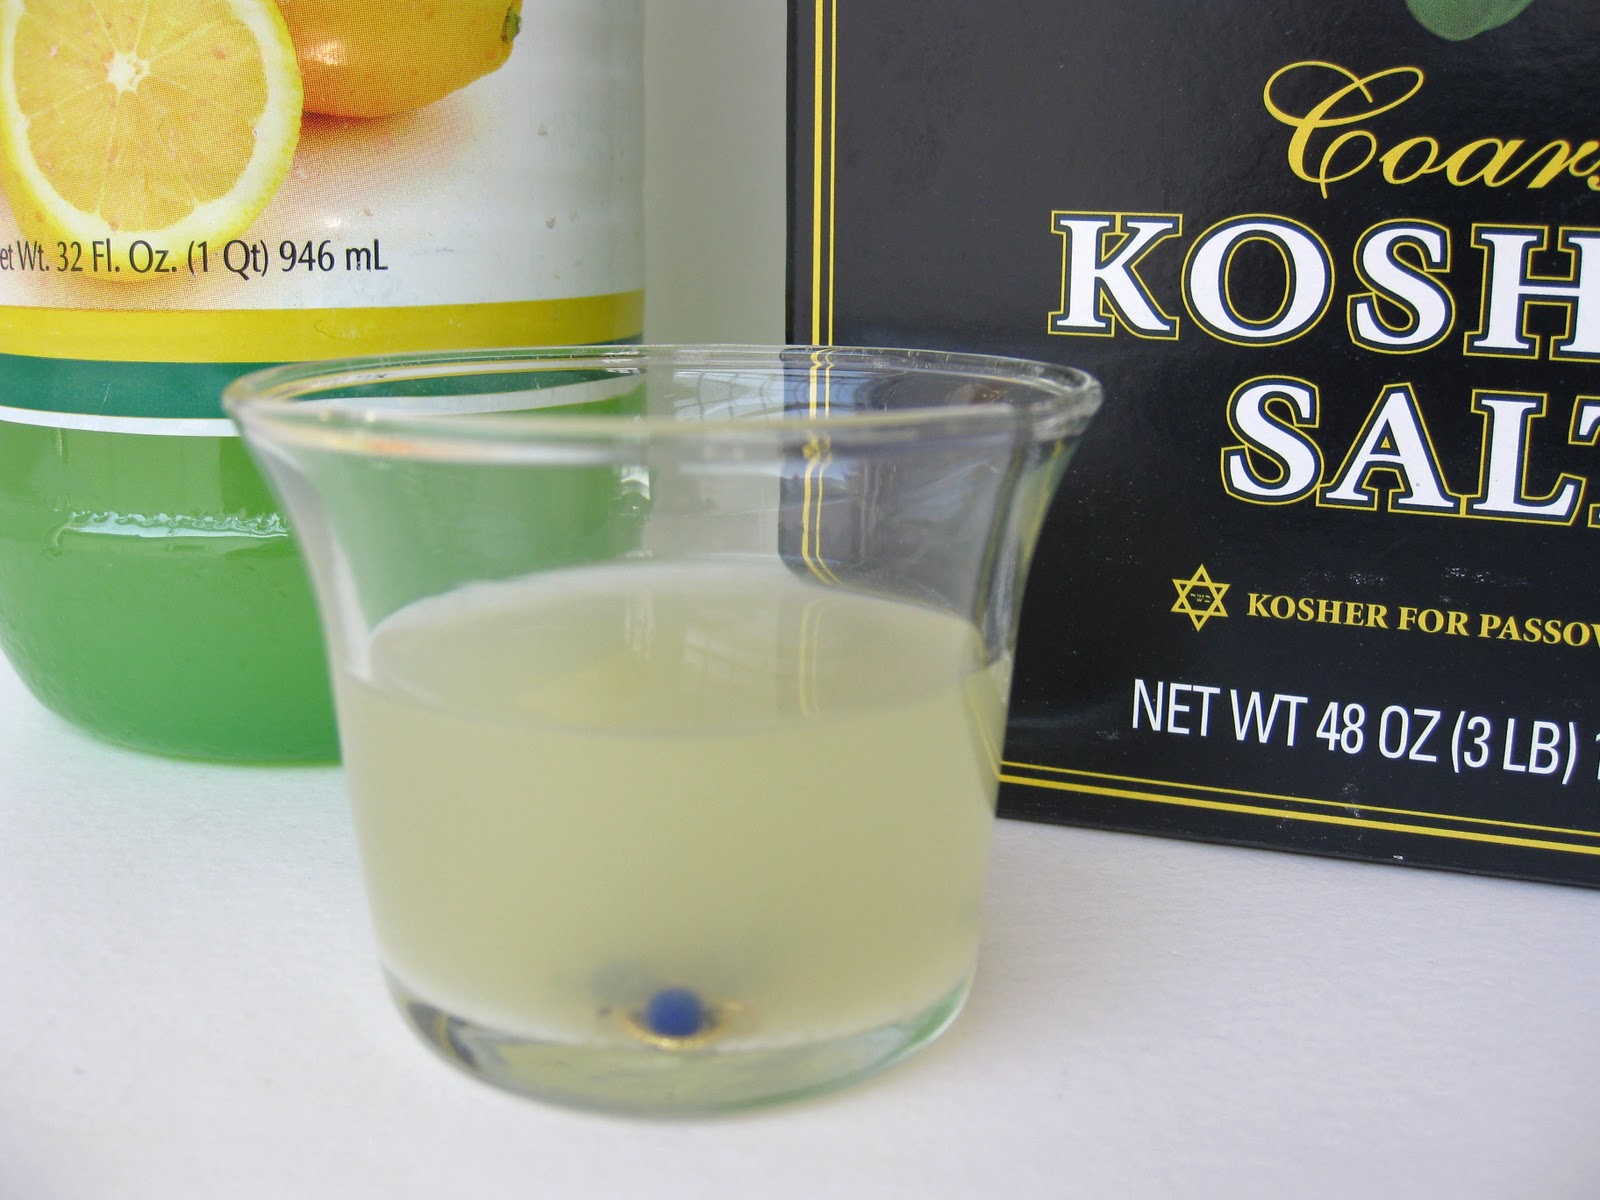
In this case, I decided to try to see if this brass could be brought back to its original golden color. You can polish brass of course - I often use ProPolish pads to check the brass stampings and findings that come into Bumbershoot Supplies. I could also use a toothbrush and polishing paste. But with wire, and tiny components with uneven patina like these charms, I want an approach that is much, much quicker. So I decided to soak them in a lemon juice and salt solution to see what happened. 


You need:
A small plastic or glass container
Lemon juice
Salt

Mix some salt into the lemon juice. I’ll be honest, I don’t measure. The dish in the photo probably holds ¼ cup lemon juice and I just threw in a bit of salt. Then, toss in the items you want to clean.


And wait. Usually I don’t have to wait very long. Sometimes the removal of the patina is within minutes, rarely it takes a few hours. I just check regularly until I can see the process is complete. By the way, I'm told that vinegar works too, I haven't tried that yet.


Note that with these particular charms, some came very clean of patina and are now golden in color, and others are revealed to be a mottled golden and reddish color. This is the end point for these charms.  Further time in the lemon juice and salt mixture will not convert them to a uniform golden color since this reflects the characteristics of the old brass from which they were made and the oxidation reaction that caused the original patina.

Now I have another decision point. Do I work with the mottled charms as they are, or do I go the other direction, and use chemicals to patina the brass to a uniform dark color? Since I am looking for a uniform appearance, I decided to darken them.


Here’s what it looks like to dunk the mottled charms into a patina solution – they darken up nicely and uniformly. This picture actually shows 2 lots of charms: 1) two of the charms from above that were first in the lemon juice-salt solution and 2) one charm that I put directly into the patina solution without going through lemon juice-salt first. I can't tell the difference. You could, at this point, polish these charms a bit to bring out golden highlights on the textured jump ring, or you could leave them as is.

Sometimes the lemon juice and salt soak works quite well. In the photo above, I show some 1940’s occupied Germany glass and brass wired flower clusters that came out nicely golden after being in lemon juice and salt. I also put these in patina solution, that cluster is shown on the right. The original is in the middle. The result you get from a lemon juice and salt soak depends on the characteristics of the original brass, the characteristics and age of the patina, and the shape of the metal, for example, plate vs. wire, wire thickness, twists, and so on.


One side effect of using lemon juice and salt to remove patina from brass is that it cleans up glass beads too. I had tried many methods to get the beads in these charms clean and pretty much despaired of being able to use them. Then, in looking for materials to use for this tutorial, I tossed these into the lemon juice and salt, and look at how clean these beads are now! Originals on the left, soaked bead on the right. And no effort on my part, I love that.

One thing I have found in working with vintage materials, is that it helps if you can locate that adventurous part of yourself, the part that is curious and willing to take risks, even take a risk with a piece or two of your materials to see what will happen. This is because vintage materials are unpredictable and you can’t guarantee results. Start slow, just a few or even one piece at a time to see what happens.

And let me know how it goes!


Friday, February 25, 2011

Sneak Peek 2. New Vintage Inspired Designs at Bumbershoot Designs


The muse cannot be stopped!
I do create all the time. If I don't, I start to feel like I can't breathe.
However, a few times a year, the muse really gets going and I'm still in the midst of that experience.
In this blog post, I shared a first Sneak Peek at some of the new designs I have been busy creating for Bumbershoot Designs. I've put 20 of the new designs into Bumbershoot Designs so far, and I have many more to add (the muse prefers to create, it is a negotiation to get the paperwork and listing done).


Here is Sneak Peek 2, watch for these new designs to appear in Bumbershoot Designs. Feel free to ask about anything if you are interested and don't see it listed...


I think of this necklace as a Rainier raindrop. It is a great layering necklace, made from a vintage teardrop and a vintage pearl headpin. Those are pearl headpins adorning the stave-shaped floral earrings above, too.


This necklace matches the earrings shown in the first photo. I've used pear shaped montana sapphire rhinestones, Czech from the 1950's and stripped the foil backing off them (see this tutorial for how to do that). Then I set them in antiqued brass, but I set them in upside down in order to show off the lovely faceting on the back of the stone. I'm using a rose clasp on this necklace for a bit of pretty at the nape of the neck.


I wish I could find more of these settings because they are so graceful and work very well with vintage cabochons. These earrings feature vintage glass cabochons that are the turquoise-y blue of robin's eggs. I love the organic appearance of the mottling and how it works with the antiqued brass. Spring is coming!


This vintage envelope locket has sat on my worktable for a very long time. The color was rather unusual, and could not be used as it was. Finally I found the time to patina it and here it is, transformed. I wish I had taken a before picture. This one opens for a little note, or mantra, or inspirational phrase, or wish to be tucked inside.


Silvery springtime moonlight bathing Paris. I wonder if I will ever return to Paris. I wonder if it is still the same magical city I remember. I have a dream of returning there with our daugher Emma. Fingers crossed...


Coming next, designs featuring sterling silver and vintage components. Stay tuned...

Until then, wishing you a wonderful weekend!

Received Today for Bumbershoot Supplies. Vintage Glass Bead Drops With Embedded Wires


I'm so excited to have received these beads today. Watch for them to show up in Bumbershoot Supplies in the coming week. These are vintage Japanese glass beads in teardrop shapes, with embedded wires, design ready. Above I show the long ones that just arrived. Below I show the smaller ones that just arrived.


For your planning purposes, I'm limited on each one of these colors. Find them in Bumbershoot Supplies next week or just contact me.
We also currently have available navy blue, transparent grey and white in the smaller size.

Bumbershoot Designs in the Seattle Times Daily Find, The Vintage Bride


How exciting to find Bumbershoot Designs mentioned in the Seattle Times' Daily Find yesterday! The article was focused on "The Vintage Bride" and if you scroll down to the jewelry section, you will find Bumbershoot Designs as well as a specific mention of 3 of my vintage glass pearl pieces.


Vintage glass pearls are some of my favorite vintage materials to work with. I use them often. There are several glass pearl designs at Bumbershoot Designs and we stock many absolutely fabulous vintage glass pearls at Bumbershoot Supplies.


Thanks so much to Bree Coven Brown for selecting Bumbershoot Designs to include in this article!

It was a very wonderful surprise!

Thursday, February 24, 2011

Featured Artist. Deborah Blut of Garter Mademoiselle and The Pink Birdhouse on Etsy


Wedding season is rapidly approaching and just in time, I have met Deborah Blut of
There may be others out there, but Deborah is the first artist that I know of who is using supplies from Bumbershoot Supplies in some of her garter designs. Cool!


Garters are commonly thought of as a wedding tradition. Deborah was kind enough to provide me with some information, and I also did some research on my own and here is what I learned about the history of wedding garters. Apparently the tradition began back in the 14th Century in Europe. It was thought that having a part of the bride’s clothing would bring good luck. This resulted in some boisterous practices, as guests escorted the couple to the bridal chamber and then determined to obtain the bride’s clothes. Eventually, over time, the tradition has evolved to occur at the wedding reception, in which it is the groom’s task to remove the garter and toss it to the single men in the crowd, the idea being that the one who catches the garter will next marry, a tradition similar to the bridal bouquet toss.


If a bride chooses to follow this tradition, she will often purchase a pair of garters, one to toss and one as a keepsake. You can see how Deborah has designed beautifully complementary garters with this tradition in mind.


Of course, garters are functional items of clothing that were historically used, and sometimes still are used, to hold up stockings and socks. This pair is inspired by garters from the 1920’s, during which women would wear garters on each leg to hold up their stockings.


With the invention of elastic and pantyhose, they are not used as much, although since I am Canadian, I feel compelled to note that hockey players still use a type of garter to hold up their socks. Plus, garters and garter belts are still often worn for fashion purposes.


And you can completely understand that when you see Deborah’s garters. When I was a bride, I chose not to follow the garter tradition. I didn’t even know I might want a garter until I visited Deborah’s shops and saw her wonderful creations.
Part of the appeal for me is the quality of materials Deborah works with, including vintage laces, silk, and many different vintage glass pearls, buttons and baubles. The other part of the appeal is Deborah’s extraordinary design sense and craftsmanship, including her stunning ribbonwork silk flowers. They are just so pretty!


I hope you will enjoy a visit to Garter Mademoiselle or to The Pink Birdhouse to see all of Deborah’s beautiful and gorgeously crafted garters. Who knows, you might find yourself wanting one too!