Whenever I get the chance, I love to work with all kinds of glass on embedded wire, including beads, headpins, and wired flowers. To me, they encompass all that is wonderful about vintage materials - great and innovative glass composition and colors, individually hand formed shapes full of character, and a connection to artisans and designers of the past. And just because something is called a headpin, doesn't mean I use it that way. It may be the perfect tiny bead drop or button once I have turned it into one :)
Here’s a few tips I’ve learned while working with these special beads.
First, whether the wire is long or has already been looped, check it for structural integrity. Some patina or tarnish may add desired character, but as beads with wire age, their wires can become fragile with time. Before using them in designs, I twist and turn every bead's wire to ensure the wire is secure in the glass and can be manipulated without breaking.
Note that vintage glass pearls may show discoloration of the wires due to the way they were made. With the vintage grey pearls shown above, each bead was individually dipped several times in the solution that forms the nacre of the glass pearl, so you can see residual grey nacre on the wire.
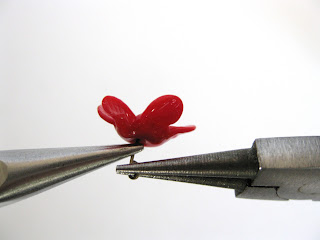
I always handle wired beads gently. The most vulnerable spot is at the connection of the bead with the wire. To turn beads on wire into drops that you can use as dangles in your designs, with one pair of pliers (narrow chain nose, on the left in the photo), hold the headpin securely at the base of the wire near the glass. Using a second pair of pliers (round nose on the right in the photo), turn the loop from the end of the wire in. That way you won't stress the connection.
For thinner gauges of wire, I often create a loop with 2 layers of wire, rather like a split ring. Sometimes I create this on the bead and use a jump ring to connect the bead into my designs. Sometimes I connect the bead directly onto the chain or wire of the design.
Alternatively, you can estimate the amount of wire you need for a loop and clip the excess wire off first, then turn from the end in towards the glass to form a single thickness loop. I am more likely to chose this approach with sturdier, thicker gauge wires.
Finally, sometimes I choose to create a design that will form the loop further along the wire, instead of right at the base against the glass. For example, in these earrings, I placed a bead cap and a bead on the wire first, isolating and protecting the join of the bead and wire, and then created my loop above this stack. This is another method to decrease stress on the join between the wire and the bead. In this case, I also created a double loop because the gauge of these wires is so thin.
I hope these tips are helpful. If you’ve worked with these types of beads before and have other thoughts on how to successfully incorporate them in designs, please let us know!


Thank you! I loved this lesson! Great information & thanks for sharing!
ReplyDeleteHappy New Year!
Wow! Thank you so much for all the tips.
ReplyDeleteExcellent and useful information!
ReplyDelete